Follow these steps to get started exploring the sample scenes included in the SDK.
- Step 1: Install and make sure your eye tracker is working
- Step 2: Download the Tobii Unity SDK for Desktop
- Step 3: Import the SDK package to a new Unity project
- Step 4: Get to know the API and the eye-gaze data
- Step 5: Implement eye tracking features
- Step 6: Build for standalone
- Step 7: Universal Render Pipeline
Step 1: Install and make sure your eye tracker is working
Version 4.1 of the Tobii Unity SDK for Desktop requires the following setup on your computer:
- Unity 2019.4 or higher
- Windows 10, 8.1, or 7
- Tobii Experience (either downloaded install bundle for a peripheral eye tracker, or pre-installed on integrated systems)
- Tobii consumer eye tracker peripheral or built-in device. You can find information about available products here: https://gaming.tobii.com/products/.
The code samples in the SDK and the code snippets here in the documentation are all written in C#. Follow the instructions included with your eye tracker to download and install the correct Tobii drivers. Make sure the eye tracker and software are working correctly.
Step 2: Download the Tobii Unity SDK for Desktop
If you haven’t already done so, please create an account for these pages and download the Tobii Unity SDK for Desktop here:
Step 3: Import the SDK package to a new Unity project
Save the Tobii Unity SDK for Desktop and unzip the package.
Open Unity, and create a New Unity Project. Select Windows as Target Platform. In the Unity Editor menu, select: Edit → Build Settings....
Select the following settings:
- Platform:
PC, Mac & Linux Standalone - Platform Target:
Windows - Architecture:
x86orx86_64
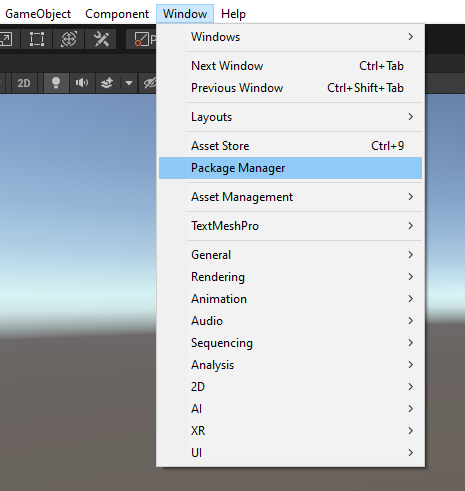
 Open the Package Manager
Click “Add package from disk…”
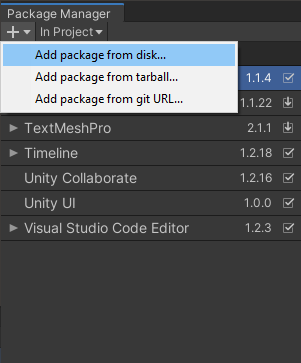
Select the package.json file from the download location

Import the Gaze Point Data sample
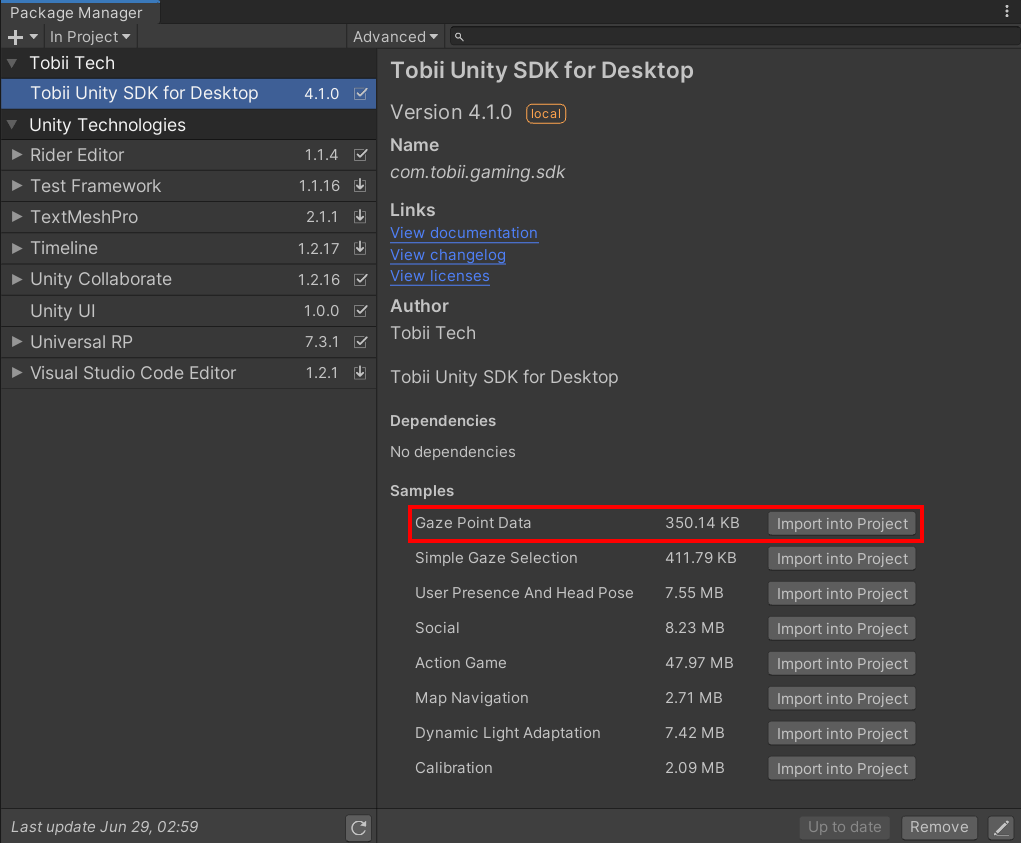
Step 4: Get to know the API and the eye-gaze data
Run the Example_GazePointData scene found under the Samples folder.
Explore the other provided sample scenes and get an overview of the core features of the SDK and popular eye tracking features in games. See also API Overview.
![]()
Step 5: Implement eye tracking features
To start using the TobiiAPI, add using Tobii.Gaming; to a script, type “TobiiAPI.” and browse the static functions of the API:

You might also want to explore the possibilities of the the built-in object selection using eye-gaze by adding the Gaze Aware component to some of your game objects. The following sections give some hints what to explore.
Drag and drop eye tracking features to your game
You get the latest Gaze Point by calling TobiiAPI.GetGazePoint() from any script where you have added using Tobii.Gaming; at the top of the script.
In the Tobii Gaming Team, we have implemented and helped implement eye tracking features in a number of games (from AAA titles to indie games) using this basic Gaze Point data. Over the years we have made a number of iterations and improvements to the algorithms. And now, for your convenience, we are making all our best algorithms freely available for you to use in your game (as long as they are used with Tobii eye trackers). Just drag, drop, and setup/adapt to fit your game. This is probably the fastest way you can add Tobii Eye Tracking features to your game.
Here is a list of features up for grab, and their scripts are all available in the samples:
- Extended View rotates the camera when you look towards the edges of the screen
- Clean UI makes UI elements semi-transparent if you don’t look at them
- Aim at Gaze aims your gun at the gaze point when you press an aim button
- Interact at Gaze lets you interact directly with what you are looking at
- Map Navigation pans to or zooms where you are looking at the press of a button
- Dynamic Light Adaptation adjusts scene light exposure depending on your gaze point
Make game objects Gaze Aware
The SDK also comes with basic built-in gaze to object mapping. This enables eye tracking features like:
- Interact at Gaze with the press of a button – interact directly with the object you are looking at
- Gaze Awareness lets your game react to the user’s intentions by following their eye-gaze and attention
First, add Tobii Initializer prefab to the scene. This prefab initializes eye tracking with the appropriate settings. Alternatevely, you can call TobiiAPI.Start() function at the scene startup.
You can make a game object Gaze Aware by adding the Gaze Aware component in the Inspector: Add Component → Tobii → Gaze Aware.
![]()

The component’s HasGazeFocus property lets the object know if the user’s eye-gaze is focused on the object or not. Read the HasGazeFocus property in the Update loop of a Gaze Aware game object and have it react to the user’s eye-gaze by changing its behavior or appearance. Or, let your underlying game algorithms query which game object the user is looking at using TobiiAPI.GetFocusedObject(), and have the game respond to the user’s eye-gaze in some other way.
// Example script on Gaze Aware object:
// Make object spin when looked at!

using Tobii.Gaming;
using UnityEngine;

[RequireComponent(typeof(GazeAware))]
public class SpinOnGaze : MonoBehaviour
{
    private GazeAware _gazeAware;

    void Start()
    {
        _gazeAware = GetComponent<GazeAware>();
    }

    void Update()
    {
        if (_gazeAware.HasGazeFocus)
        {
            transform.Rotate(Vector3.forward);
        }
    }
}
Note that Gaze Aware objects might not be a good fit for your particular game genre, game mechanics, or size and amount of game objects. But it is usually at least a very convenient way of prototyping object interaction ideas.
Configure layers for Gaze Aware objects
If you use the Gaze Aware component, you should set up the gaze focus (G2OM) detection layers. Note that UI elements like buttons and labels do not work with the Gaze Aware component since the feature only works with objects with a UnityEngine.Collider.
![]()
Click to open the Tobii Initializer‘s Layers property multi-selection dropdown and make sure that all the layers are selected where you want Gaze Aware game objects to be focusable using eye-gaze. Also, make sure that layers you do not want to track with eye-gaze are not selected (like transparent layers).
Step 6: Build for standalone
The Tobii Unity SDK assets include an editor script for copying the correct plugin dll’s to the build output folder. The Tobii Unity SDK features are currently only available and working for PC (Windows 10/8.1/7), but the framework compiles on Mac and Linux as well (without copying the dll’s).
Step 7: Universal Render Pipeline
- This package uses materials made for Built-in Render Pipeline. When using URP please don’t forget to upgrade the materials using
Edit→Render Pipeline→Universal Render Pipeline→Upgrade Project Materials to URP Materials. BulletholeMaterialandLaserSightImpactdecal materials might lose alpha transparency after an automatic upgrade.Highlightmaterial in the Action Game sample doesn’t support URP. You will still be able to select the objects in this sample but with no highlight visualization.- Action Game First Person sample is using stacked cameras for weapon visualization. To use with URP please change
Render TypetoOverlayfor theWeaponCameraand addWeaponCamerato theStackof theMainCamera. - Dynamic light adaptation sample is made for Built-in Render Pipeline and doesn’t support URP.
Done. Now let’s take a minute to review the API and some basic concepts of eye tracking.