
Advanced Signals - Getting Started in Unity/C#
The Advanced API can be accessed with a Tobii Ocumen license.
By following this getting started guide, you will have a scene where spheres adjust to the size of your pupils, by adjusting the luminosity of the scene.
For a full overview of what the Advanced API contains, see the API Reference page.
The recorded participant has an eye condition making his left pupil not react properly to light changes.
Table of Contents
Step 1: Installation
Follow our installation steps in Ocumen for Unity Getting Started.
Step 2: Set up your scene
-
Create a new scene and set it up with an XR Rig for your device, see previous step for more details.
-
Create two spheres, name them LeftPupil and RightPupil.
-
Position the LeftPupil at (-4, 0, 15).
- Position the RightPupil at (4, 0, 15).
- Create a new material, name it PupilColor and drag it to both LeftPupil and RightPupil game objects.
Change the color of PupilColor to grey (R:100, G:100, B:100).

Step 3: Setup the TobiiXR Initializer prefab
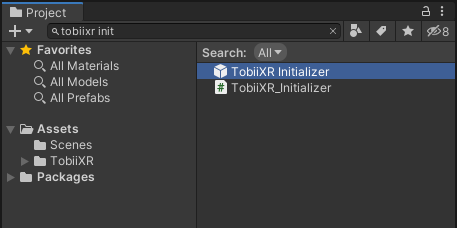
Search for the TobiiXR Initializer prefab in the Project tab and drag it into your scene.
Make sure you set the search option to “All” or “In Packages” because the prefab can be found in the packages folder.
Drag your license file to the License Asset field in the TobiiXR Initializer prefab in your scene.
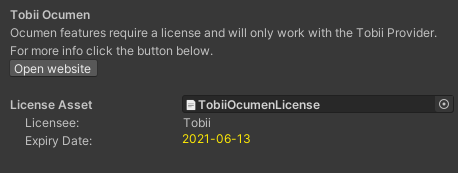
The license must have the file extension “.bytes”.
Step 4: Create AdjustToPupil script
Create a new script called AdjustToPupil and add it to both the LeftPupil and RightPupil game objects.
Add the following code:
using Tobii.XR;
using UnityEngine;

public class AdjustToPupil : MonoBehaviour
{
	public bool IsLeftPupil;

	void Awake()
	{
		transform.SetParent(Camera.main.transform, false);
	}

	void Update ()
	{
		// Fetch the latest pupil data.
		var latestData = TobiiXR.Advanced.LatestData;
		var isPupilValid = IsLeftPupil ? latestData.Left.PupilDiameterValid : latestData.Right.PupilDiameterValid;
		var pupilDiameter = IsLeftPupil ? latestData.Left.PupilDiameter : latestData.Right.PupilDiameter;

		// Scale the sphere according to the pupil diameter of the user.
		if (isPupilValid)
		{
			transform.localScale = Vector3.one * pupilDiameter;
		}
	}
}
Step 5: Tick the IsLeftPupil bool
Enable the IsLeftPupil bool for the LeftPupil game object.

Step 6: Create AdjustLuminosity script
Create a new game object, rename it LuminosityManager and then create and attach a script called AdjustLuminosity to it.
Add the following code:
using UnityEngine;

public class AdjustLuminosity : MonoBehaviour {

    private Camera[] _cameras;

    void Awake ()
    {
        _cameras = Camera.allCameras;

        // Set the cameras to use a solid color as background, and set it to black.
        foreach (var sceneCamera in _cameras)
        {
            sceneCamera.clearFlags = CameraClearFlags.SolidColor;
            sceneCamera.backgroundColor = Color.black;
        }
    }

    /// <summary>
    /// Updates the background color of the cameras, lerping between black and white.
    /// </summary>
    private void Update()
    {
        var speed = 0.5f;
        var sine = Mathf.Sin(Time.timeSinceLevelLoad * speed); // Generate value between -1 and +1 on a sine curve.
        var translation = sine + 0.5f; // Adjust that value to be between -0.5 to +1.5.
        var newColor = Mathf.Clamp(translation, 0, 1); // Clamp value between 0 and +1, will pause at both ends for missing .5f.

        foreach (var sceneCamera in _cameras)
        {
            sceneCamera.backgroundColor = new Color(newColor, newColor, newColor);
        }
    }
}
Step 7: Run the example
Run the example directly in the editor or build and deploy it to your device if you are running on android.